
Object-level restore in Oracle RAC database using Commvault
Commvault backup tool comes packed with number of cool features and support for multiple agents including Oracle RAC. One of the such feature is the ability to perform an object-level restore. Using Commvault, an administrator can restore/recover a single datafile, tablespace or, a table. The steps to perform a table level restore are no different then taking a backup, restoring the data in an auxiliary instance and then export/ import the table. Commvault however, provides a simple user-interface to perform all of these steps while automating a good chuck of it!
In this article, we will cover the steps to restore a table in an Oracle RAC database using Commvault. The steps documented in this article were performed on an Oracle 12c RAC database however, the procedure would be similar for Oracle 11g and higher databases. This procedure does not work on container databases (CDBs).
Enabling Commvault for table level restore
The very first step to recovery is backup and your Oracle RAC database must be configured under Commvault. Configuring a new Oracle RAC client and sub-clients in Commvault will be covered in another article. Once your Oracle RAC client is configured, if not already, you need to ensure that the sub-client for the database is configured for table-level restore. If not, an attempt to restore/ recover a table will result in the error “Browse request failed”!

To enable a Oracle RAC sub-client for table-level restore, right-click on the default backup sub-client for database and click on properties.

On the sub-client properties page, on the “Advanced” tab and click on “Options” tab and check the option which reads, “Enable Table Browse” and click on “OK”.

Now, your Oracle sub-client has been enabled to perform a table-level restore however, only the backups taken after the option is enabled will have the capability and not the previous backups. At this time, you would want to take a full backup of your database. If not, Commvault will automatically convert the next backup to a full/ incr-0 level backup.
Backup database
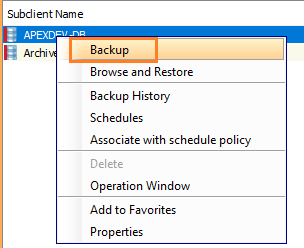
Right-click on the default sub-client and click on “Backup.
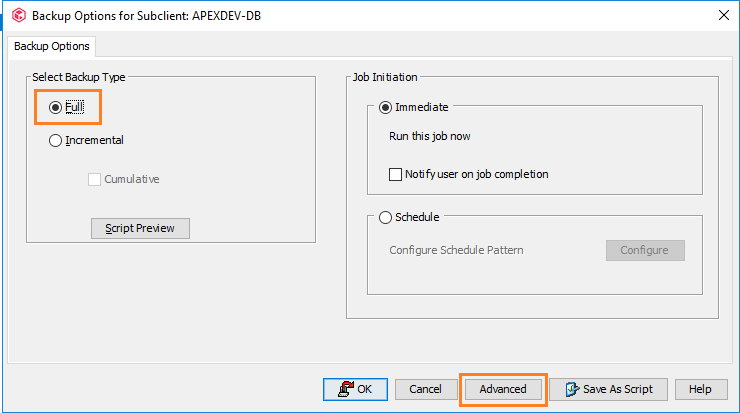
On “Backup Options” page, select “Full” and click on “Advanced” button.
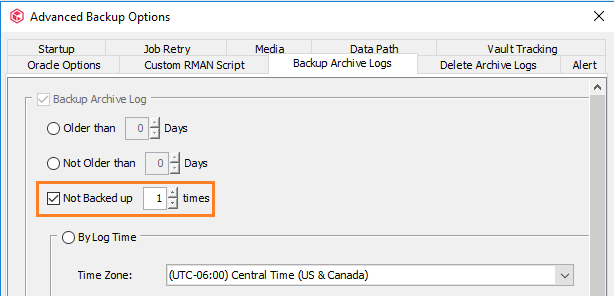
On the “Advanced Options” page, click on “Backup Archive Logs” tab and ensure that appropriate options for archive log backups are selected. Click on “OK” to go back to the previous screen and again click on “OK” to start a backup.
Alternatively, you can initiate a backup using RMAN command line. Below is the sample command:
[CONFIGURE CONTROLFILE AUTOBACKUP ON;
run {
allocate channel ch1 type 'sbt_tape' connect <USER_NAME>/<PASSWORD>@database_name
PARMS="SBT_LIBRARY=/opt/commvault/Base/libobk.so, BLKSIZE=1048576 ENV=(CV_mmsApiVsn=2,CV_channelPar=ch1,ThreadCommandLine= -chg 1:1 -rac 7  -vm Instance001)"
TRACE 0;
allocate channel ch2 type 'sbt_tape' connect <USER_NAME>/<PASSWORD>@database_name
PARMS="SBT_LIBRARY=/opt/commvault/Base/libobk.so, BLKSIZE=1048576 ENV=(CV_mmsApiVsn=2,CV_channelPar=ch2,ThreadCommandLine= -chg 2:1 -rac 9  -vm Instance001)"
TRACE 0;
setlimit channel ch1 maxopenfiles 8;
setlimit channel ch2 maxopenfiles 8;
backup
incremental level = 0
filesperset = 8
format='1949092_%d_%U'
database
include current controlfile  spfile  ;
}
exit;
]

[CONFIGURE CONTROLFILE AUTOBACKUP ON;
run {
allocate channel ch1 type 'sbt_tape' connect <USER_NAME>/<PASSWORD>@database_name
PARMS="SBT_LIBRARY=/opt/commvault/Base/libobk.so, BLKSIZE=1048576 ENV=(CV_mmsApiVsn=2,CV_channelPar=ch1,ThreadCommandLine= -chg 1:1 -rac 7  -vm Instance001)"
TRACE 0;
allocate channel ch2 type 'sbt_tape' connect <USER_NAME>/<PASSWORD>@database_name
PARMS="SBT_LIBRARY=/opt/commvault/Base/libobk.so, BLKSIZE=1048576 ENV=(CV_mmsApiVsn=2,CV_channelPar=ch2,ThreadCommandLine= -chg 2:1 -rac 9  -vm Instance001)"
TRACE 0;
setlimit channel ch1 maxopenfiles 8;
setlimit channel ch2 maxopenfiles 8;
sql "alter system archive log current";
backup
filesperset = 32
format='1949092_%d_%U'
(archivelog  all   not backed up 1 times  delete input );
}
exit;
]
Perform a table-restore test
Once a full backup of the database is taken, we are now ready to perform a table-level restore! For the test, you would not want to mess with any of the existing tables instead let us create a new tablespace and a new table and then see if we are able to restore the table.
First, let us create a new tablespace and a new table with some data.
CREATE TABLESPACE testrestore
DATAFILE '+DATAC1/APEXDEV/DATAFILE/testrestore.dbf'
size 10m
AUTOEXTEND 20m;

-- Create a new table
CREATE TABLE table1(
   id INT GENERATED ALWAYS AS IDENTITY,
   col1 VARCHAR2(32)
) TABLESPACE testrestore;

-- Insert a few rows into the new table

BEGIN
   FOR counter IN 1..50 loop
      INSERT INTO table1(col1)
      VALUES(sys_guid());
   END loop;
END;
/

-- Check the count of rows in the new table
select count (*) from table1;

-- Check current SCN
select CURRENT_SCN from v$database;
At this time, Commvault does not have any records of this table being created. Let us initiate a full and archive log backup. The steps to take a backup are mentioned above.
Once the backup is taken, let us drop the table.
-- Drop table
DROP TABLE TABLE1;
COMMIT;
select * from dba_objects
where object_name = 'TABLE1';
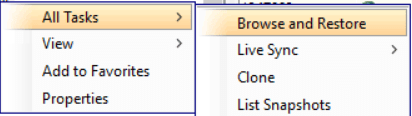
Now, login to Commvault console, navigate to and right-click on the Oracle RAC client, go to “All Tasks” and click on “Browse and Restore”. Please note that table-level restore option will only work on the Oracle RAC client and not the backup or, archive-log sub-clients.
On the “Browse and Restore Options” page, on the “Time Range” tab, select “Latest Backup”, “Table View” and click on “View Content”.

Now, Commvault will list all the tables included in the backup. Let us navigate to the schema where the table was created and select the table which need to be restored and click on “Recover All Selected”.

On the resultant page, go to “Table Restore” tab and provide a path where an auxiliary instance can be created. This path should have appropriate permissions set for the Commvault agent to create sub-directories and files. Check the “Cleanup Auxiliary” option if you would like to delete the auxiliary instance after the restore operation is completed.

Now, go to “Advanced Options” tab and select “Import to Source DB” option. If the table is not dropped earlier, you can check the “Drop Table for Import” option and Commvault will automatically drop the table for you. In a real-world scenario, I would just rename the previous table to be on the safer side. Now, click on “OK”.

The same steps can be performed using the below sample script. Please modify any applicable options.
#******DATA RESTORE SCRIPT******#
run {
allocate auxiliary channel ch1 type 'sbt_tape'
PARMS="SBT_LIBRARY=/opt/commvault/Base/libobk.so, BLKSIZE=1048576 ENV=(CV_mmsApiVsn=2,CV_channelPar=ch1)"
TRACE 0;
set newname for datafile 9 to '/ora1/oracle/backup2/apexaux/1949193/testrestore.dbf_9';
set newname for datafile 3 to '/ora1/oracle/backup2/apexaux/1949193/sysaux.257.1004020333_3';
set newname for datafile 1 to '/ora1/oracle/backup2/apexaux/1949193/system.258.1004020419_1';
set newname for datafile 4 to '/ora1/oracle/backup2/apexaux/1949193/undotbs1.260.1004020515_4';
set newname for datafile 5 to '/ora1/oracle/backup2/apexaux/1949193/undotbs2.265.1004020873_5';
set newname for datafile 2 to '/ora1/oracle/backup2/apexaux/1949193/undo_tbs.661.1005736191_2';
set newname for datafile 8 to '/ora1/oracle/backup2/apexaux/1949193/xxapex_data.1460.1008330967_8';
 set until scn 5990421660093
;
 duplicate database 'APEXDEV' to 'tsrst193'
 TABLESPACE 'TESTRESTORE', 'SYSAUX', 'SYSTEM', 'UNDOTBS1', 'UNDOTBS2', 'SYS',
'UNDO_TBS', 'XXAPEX_DATA'
 PFILE='/ora1/oracle/backup2/apexaux/tsrst193init.ora'
LOGFILE
'/ora1/oracle/backup2/apexaux/1949193/redo01.log' SIZE 4096K reuse,
'/ora1/oracle/backup2/apexaux/1949193/redo02.log' SIZE 4096K reuse,
'/ora1/oracle/backup2/apexaux/1949193/redo03.log' SIZE 4096K reuse;
}
exit;
Once the restore operation starts, you can monitor the progress using the Commvault Job Controller window. Based on the size of the tablespace and the table being restored, it might take some time for it to be restored. Once the restore operation completes, you can connect to the database and validate that the table has now been restored.
Hope this helps!
Discover more from IT-Noesis
Subscribe to get the latest posts sent to your email.

Great, I was looking this functionality for longtime.
LikeLike