
Introduction:
In this article, we will explore the various types of storage solutions provided by Oracle Cloud Infrastructure that enable users to store, access, and manage data. These storage solutions support high availability, durability, and scalability for a wide range of use cases, including backup & recovery, archiving, file sharing, and application storage.
Types of storage in Oracle cloud infrastructure:
Object Storage: A highly available, durable, scalable, and cost-effective storage solution that allows users to store and retrieve large amounts of data in its native format.
Block Volume: Low-cost storage with a performance auto-tuning feature that can be attached to virtual machines just like a local disk to provide additional storage capacity. It can go up to 1PB in size.
File Storage: A fully managed, highly available, and scalable file storage solution that can support data up to 8 exabytes and eliminates the need to provision capacity in advance, allowing access to files via VCN peering, Oracle Cloud Infrastructure FastConnect, or virtual private network (VPN).
Archive Storage: A low-cost, highly durable, and secure storage solution that is perfect for long-term archiving and data retention. This, however, does not focus on performance.
Storage Gateway: A hybrid storage solution that allows seamless extension of on-premises storage infrastructure to the cloud for hybrid cloud deployments.
Key Features and Use Cases:
The following table summarizes the key features and use-cases for each type of storage in Oracle Cloud Infrastructure:
| Storage Type | Key Features | Use Cases |
| Object Storage | Low-cost, Highly durable, and secure; Designed for long-term data retention | Backup and recovery; Archiving; Content management; Big data analytics; Static data; Media files |
| Block Volume | High performance; Low latency; Supports multiple instance types; High IOPS; Offers storage performance SLA; Dynamic scaling; Cross-region asynchronous replication. | Database storage; High I/O applications; Virtual machine storage; Disaster-recovery |
| File Storage | Fully managed; Highly available; Supports SMB and NFS protocols | File sharing and collaboration; Application storage; Lift and shift of enterprise applications; Application requiring shared filesystems; Concurrent R/W operations |
| Archive Storage | Low-cost, highly durable, and secure; Designed for long-term data retention | Long-term data retention and archiving; Regulatory compliance |
| Storage Gateway | Seamless extension of on-premises storage infrastructure to the cloud; Hybrid cloud deployments | Hybrid cloud deployments; Backup and disaster recovery |
Quick Comparison between the size and performance of each solution:
| Type of Storage | Maximum Size | Maximum IOPS | Maximum Throughput | Maximum Object Size |
| Object Storage | 10 TB per object | N/A | N/A | 10 TB |
| Block Volume Storage | 32 TB per volume | 35,000 IOPS per volume | 1,000 MB/s per volume | N/A |
| File Storage | 8 PB per file system | 1.6 million IOPS per file system | 64 GB/s per file system | N/A |
| Archive Storage | N/A | N/A | N/A | N/A |
| Storage Gateway | 50 TB of cached data per gateway | N/A | N/A | N/A |
Configuring and using each type of storage in Oracle Cloud Infrastructure:
Object Storage
Let us follow the below steps to configure and use Object Storage in Oracle Cloud:
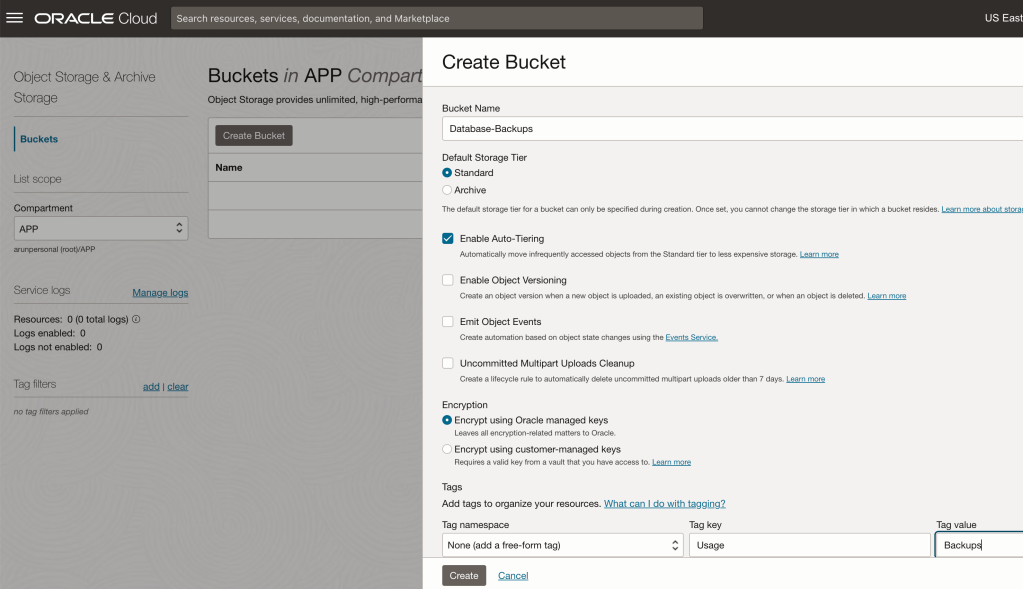
Step 1: Create an Object Storage bucket
- Navigate to “Storage” and click on “Object Storage” in OCI console and click on “Create Bucket”.
- Provide a name for the bucket and select the standard or archive storage tier based on the requirement.
- Select the appropriate options:
- Auto-tiering: Automatically moves infrequently accessed objects from the Standard tier to less expensive storage (not available for Archive storage).
- Object Versioning: Creates an object version when a new object is uploaded, an existing object is overwritten, or when an object is deleted.
- Emit Object Events: automation based on object state changes using the Events Service.
- You can either leave the default encryption option where the keys are managed by Oracle or encrypt using customer-managed keys.
- Click on “Create Bucket”.
Step 2: Upload data to the bucket
Let us follow the below steps to upload data to Object Storage bucket:
- Click on the name of the bucket that you just created and click on “Upload”.
- You can now simply drag and drop the files you want to upload or click on “Select Files” and browse the file/s that you wish to upload. It is as simple as attaching a file to an e-mail, isn’t it?
Block Volume:
Step 1: Create a block volume
Use the following steps to create a block volume:
- Click on “Block Volumes” under “Storage” in the Navigation Menu and click on “Create Volume”.
- Provide a meaningful name for the volume.
- Select the compartment and availability domain where the volume will be created.
- Select the storage capacity and performance.
- Select an appropriate backup policy and click on “Create Volume”.

Step 2: Attaching the block volume to a VM
Use the following steps to attach a block volume to a VM
- Click on the name of the block volume you want to attach and click on “Attach to Instance”.
- Select the virtual machine you want to attach the block volume to and select the device path (Different in Linux and Windows) and click on “Attach”.
File Storage:
Let us follow the below steps to configure and use File Storage:
- Navigate to Storage in Oracle Cloud Console and click on “File Storage.
- Now, click on “Create File System”.
- Provide a name and description for the new file system.
- Select the desired compartment and choose the private or public network access.
- Select whether the file system should read-write or read-only and click on “Create File System”.

Step 2: Mount the file system
Use the below steps to mount the filesystem to a VM:
- Click the name of the file system you want to mount and click on “Access Rules”.
- Click on “Add Access Rule”.
- Provide a name and description for the access rule.
- Choose the source IP address or CIDR block.
- Select the type of access (read-write or read-only).
- Click on “Create”.
- You can either select an existing mount target or create a new one.
- To create a new “Mount Targets”, click on “Create Mount Target”.
- Choose the subnet where you want to create the mount target.
- Choose the virtual cloud network where the subnet belongs and click on “Create”.
Step 3: Access the file system
To access the file system, follow the below steps:
- Log in to your compute instance.
- Create a mount point directory for the file system.
- Mount the file system to the mount point directory.
- Access the file system from the mount point directory.
Conclusion
In this article, we looked at the various storage options provided by Oracle Cloud infrastructure, their key differences and use cases.
Discover more from IT-Noesis
Subscribe to get the latest posts sent to your email.
