
Setup a new Windows virtual machine on Microsoft Azure
In the first post, we talked about getting started with Microsoft Azure and how to setup a new free Azure subscription. In this post, we will create our very first virtual machine on MS Azure.
Login to Microsoft Azure portal and click on New –> Compute –> Windows Server 2016 Datacenter.
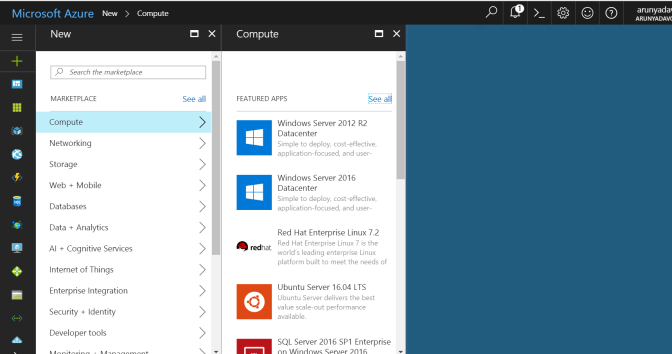
You can also search the “blade” (every new window in the Azure portal is called a blade) if the app does not appear in the “featured apps” blade.

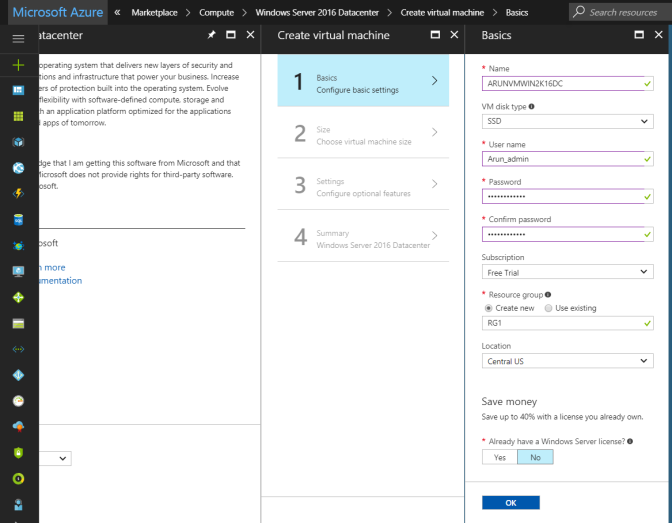
After clicking on “Windows Server 2016 Datacenter” you will see its description. The license of the operating system is included in the VM so, you don’t have to worry about it. Select “Resource Manager” as the deployment model and click on ‘Create’.

This will open a new blade where you can configure settings of your VM.
Below is a small description of all the configurable options:
- Name: This will be the name of your virtual machine. The name of a VM can only 1-15 characters long, can contain alphabets, alphanumeric characters however, cannot be just numerical or, contain non-ASCII or, special characters.
- VM disk type: You can choose the type of disks which should be attached to your VM. There are 2 options available
- SSD: SSDs are premium disks which provides higher performance and should be used for IO intensive and production workloads.
- HDD: HDDs are based on magnetic drives and provide slower performance as compared to SSD however, can be fit for non-productive environments.
- User name: A user name to access your VM. Again, it can also be 1-15 characters long.
- Password: A strong password, this can be minimum 12 and maximum 123 characters long.
- Confirm Password: The value should match that of the Password field.
- Subscription: The type of subscription you have. You will see multiple options to choose from, if you have more than one subscription. Since we are running a free trial, we will only have one option available.
- Resource Group: This provides a way to easily manage and administer your resources. The resource group name can only contain alphanumeric characters, periods, underscores, hyphens and parenthesis and cannot end in a period.
- Location: You can see a list of 26 regions here. If you have a special subscription for education etc. you will be able to see all 34-regions.
- Save Money: This option enables you to choose between consumption based and BringYourOwn licensing. Let us leave the default option selected which is “No”.
Once all the values are provided, click on “OK”.
After clicking on OK, you will be presented with the screen to choose a size for your VM. Though the portal provides a few recommendations, I prefer to click on “View all”.
Clicking on “View all” gives you a list of all the available sizes for your VM. Since this is our first VM, let us click on “F1S Standard” and click on ‘Select’.
Let us now create a new storage account, you can choose between having managed disks or, configure your own Storage Account. There are many benefits associated with managed disks such as, it allows you to create thousands of disks simultaneously in minutes, provides Industry-leading durability and availability by simultaneously replicating your data to three different replicas, offers you more security with granular access control however, having a storage accounts gives us a unique namespace to store and access our storage objects. For this illustration, we will go with our own storage account. Under “Storage account”, click on “Configure required settings”, in the next blade, click on “Create new”, in the next blade, provide a name to your storage account and leave Replication option to “Locally-redundant storage” (LRS).
Let us leave other settings as default and configure the “diagnostics storage account” where all the metrics are written so that you can analyze them later using your own tools. Please note that both the storage and diagnostics storage accounts, only allows lower case letters and numbers and values should fall between 3-24.
Unlike the Storage account, here you will get three replication options,
- Locally-redundant storage (LRS)
- Geo-redundant storage (GRS)
- Read-access geo-redundant storage (RA-GRS)
Locally redundant storage (LRS) replicates your data three times within a storage scale unit, which is hosted in a datacenter in the region in which you created your storage account. A write request returns successfully only once it has been written to all three replicas.
Geo-redundant storage (GRS) replicates your data to a secondary region that is hundreds of miles away from the primary region. If your storage account has GRS enabled, then your data is durable even in the case of a complete regional outage or a disaster in which the primary region is not recoverable.
Read-access geo-redundant storage (RA-GRS) maximizes availability for your storage account, by providing read-only access to the data in the secondary location, in addition to the replication across two regions provided by GRS.
To know more about Azure storage replication, please refer to the following link:
Azure Storage Redundancy
For now, let us choose the default option i.e. LRS and create the diagnostics storage account.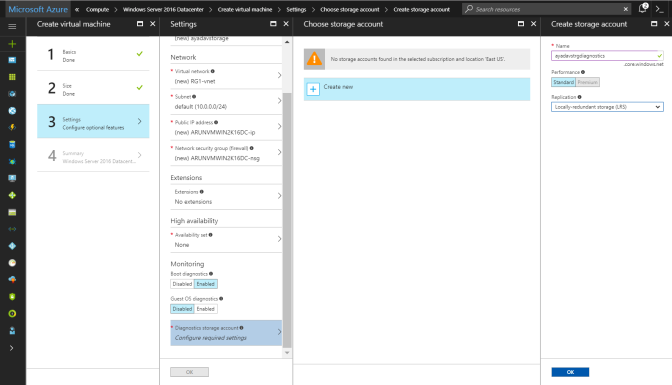
Once done, click on OK to go to the summary page.

Review the information and click OK to start building the VM. You will see that you are now re-directed to the Dashboard and the status of the new VM being built is shown.
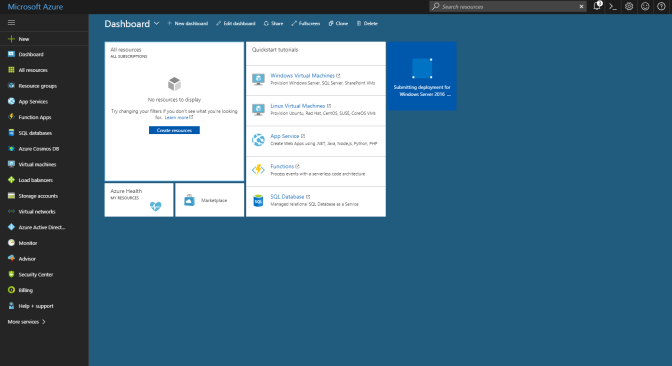
You can click on the pinned item to view more details about the status of your VM.

Scroll to the bottom to see the status of individual resources being created. Click the Refresh button on top to refresh the status.
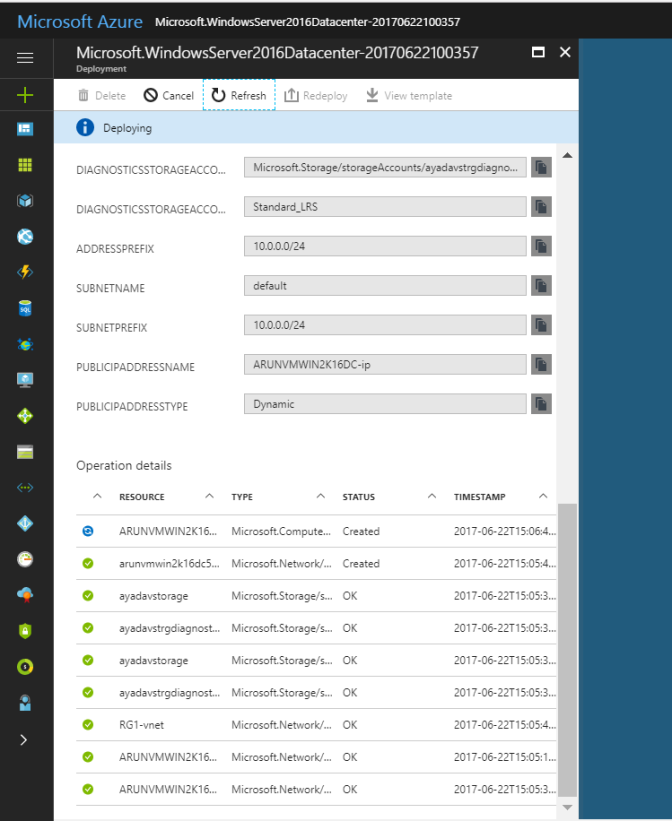
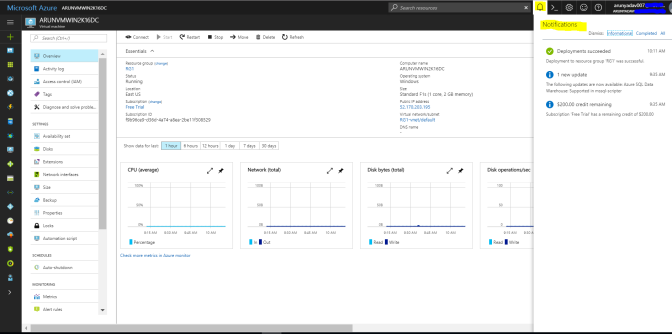
Once the VM is built, a notification message is posted in the alert section and you will be re-directed to the VM’s overview page where you can view the statistics and perform actions like stop, start, restart and even delete the VM.
Congratulations! you have built your first VM on Microsoft Azure.
How to connect to your VM in Microsoft Azure:
Now that your VM is up and running, let us attempt to make a connection to the machine.
On the top menu, click on the “connect” button. This will download a RDP file for you to connect to your new VM.

Right-click on the RDP file and click on “Edit”.

Provide the username which was created during the deployment phase and click on “Connect”. Provide the password which was set for this user and you should be able to RDP to your VM.

Congratulations! You are now connected to your new VM and can view information about the server in the server manager.

You can use the same RDP file to connect to this machine whenever you want, as long as, it has the same virtual IP Address. If the IP address changes, all you need to do is to edit the RDP file, provide the new virtual IP Address and click on Save.
What should you do next?
Perform basic administration on MS Azure
Other recommended articles:
Getting started with Amazon Web Services
Getting started with MS Azure
Getting started with Google cloud
Setup a new Linux virtual machine on Microsoft Azure
Discover more from IT-Noesis
Subscribe to get the latest posts sent to your email.

2 thoughts on “Setup a new Windows virtual machine on Microsoft Azure”